
If you’ve tried to work in Salesforce and SharePoint at the same time, you probably know how easy it is to lose your place. Maybe you’re updating an opportunity, then realize you have to hop into SharePoint to grab the contract. It doesn’t sound like a big time drain until you add it all up.
The average employee spends around 9.3 hours a week, just looking for info. Multiply that by the size of your sales or service team, and you’re looking at hundreds of wasted hours each month. It’s no wonder companies turn to Salesforce integration services to connect the dots.
When companies are done with patchwork workflows, a clean integration means fewer lost opportunities, quicker hand-offs, and more efficient teams.
Table of Contents
Connecting Salesforce and SharePoint is one of the quickest ways for companies to start solving the real problems that slow their teams down. A lot of companies rely on both of these apps, and they want them to align in one unified experience. With expert Salesforce integration services, businesses can ensure a seamless, secure, and scalable connection between platforms. The right integration leads to:
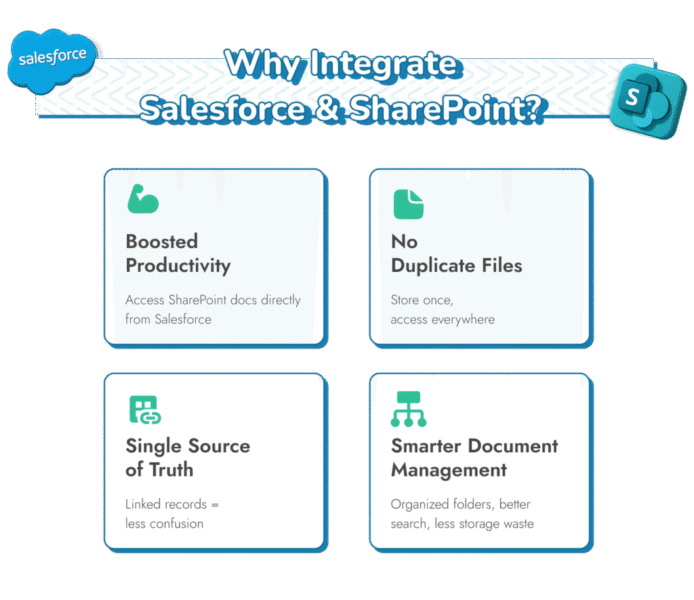
- One Place for Everything: When your records and files are aligned, you don’t have to ask, “What happened to that contract?” It’s already connected to the Salesforce record. This kind of central access builds trust, improves accuracy, and makes accountability a lot easier.
- Improved productivity: Salespeople can upload, view, and link to documents stored in SharePoint right from an opportunity or account. Legal teams can pull up contracts in a few clicks instead of waiting on someone to forward them. Everyone saves time.
- Less data duplication: Without integration, teams usually upload the same files in multiple places. That creates version confusion and racks up unnecessary storage costs. Connecting Salesforce and SharePoint means documents live in one secure location but stay accessible wherever they’re needed.
- Simplified document management: Instead of stuffing attachments into Salesforce (and blowing past your storage limits), you can push documents to the right SharePoint folders automatically. SharePoint’s search and filters make it simple to find exactly what you need.
Plus, you sidestep the hidden cost of scattered systems, help improve employee experiences, and make sure everyone is on the same page in terms of data.
Why Integrations Can be Challenging
Anyone who’s tried to link Salesforce and SharePoint can tell you; it’s rarely smooth sailing from day one. Even with pre-built connectors and tools, there are a lot of problems with:
- File Size & Type Limitations: If you deal with large media files, CAD drawings, or Excel sheets packed with macros, you’ll probably hit roadblocks. Files Connect struggles to handle big files or less common formats, which is a real problem for industries like architecture, legal, or manufacturing.
- Weak Metadata Support: Metadata is what makes documents searchable and organized. But Files Connect doesn’t sync custom metadata fields well. That leaves teams manually hunting for files or even recreating documents they already have.
- Limited Automation: Want to push a file to SharePoint automatically when an opportunity closes or archive records after 90 days? Native tools just can’t do it. Almost everything becomes a manual step, which defeats the purpose of integrating in the first place.
- User Experience Gaps: Everything can end up feeling a little clumsy. The screens don’t always make sense, and setting up permissions is more confusing than it should be.
- Security Concerns: Files Connect doesn’t give you strong controls over file-level security or compliance tracking. For industries with strict regulations, that’s a risk you can’t afford.
All of this points to the same conclusion: basic connectors might be fine for simple scenarios, but if your workflows are even a little complex, you’re going to need something more flexible.
Integration Options: Comparing Approaches
There are a couple of main ways to hook Salesforce up with SharePoint. Most teams grab a connector or some middleware since it’s quick to set up and doesn’t need much effort. But they lack flexibility. If you need your process to follow specific steps or handle unusual file types, these tools often come up short.
The two more effective options are:
Custom API Development
When you need the integration to fit like a glove, building your own API connections is often the way to go. Dedicated integration partners up secure communication between Salesforce’s REST API and SharePoint’s REST API. This unlocks all sorts of possibilities:
- Automatically upload files from Salesforce into exactly the right SharePoint folder
- Create folders on the fly based on opportunity stage or account name
- Tag documents in SharePoint with Salesforce field data so everything stays searchable
- Use custom naming rules to keep everything clean
When the process calls for even more logic, developers can bring in Apex, Salesforce’s programming language. Apex lets teams setup triggers for monitoring conditions, validating inputs, and organizing files however you like.
MuleSoft Integration
If your business already runs on MuleSoft, it can be the backbone for a broader integration. MuleSoft is great when you want to connect not only Salesforce and SharePoint, but also ERP systems, HR tools, or customer portals.
Integration partners like Routine Automation help teams use MuleSoft to set up automated flows that can do things like:
- Move a signed contract into SharePoint
- Trigger a DocuSign workflow
- Send an alert in Microsoft Teams from a single Salesforce event
MuleSoft is a powerful tool, but it is important to design carefully so you don’t end up with performance bottlenecks. That’s where the right partnerships make all the difference.
Pre-Requisites for a Successful Integration
Preparation is the key to any successful project. Take a moment to get your house in order before you partner with an integration expert, that means you should:
- Look Closely at the Data: Open both systems and see how they line up. Which fields in Salesforce should connect to which parts of SharePoint? What file names and folders already exist?
- Figure Out Who Can See What: Permissions are important to get right, particularly if you’re dealing with contracts and client data. Decide who gets to see what.
- Talk to the People Using It: Every team has its own priorities. Bringing them into the conversation early means you can tailor your integration to their needs.
- Define What Success Looks Like: What are you trying to fix and improve? Is the goal to cut down on duplicate files, or just improve efficiency?
- Leave Room in the Schedule: Even simple setups take longer than expected. Give your team time to figure everything out. Don’t rush it.
Setting up a custom integration isn’t something you do overnight. There are a few steps, some varying depending on the path you choose. Most of the time, you’ll need to:
Step 1: Gather Details
First, somebody has to sit down and ask the right questions. What files need to move? When should that happen? Are there any legal rules? This is the part where you figure out what you’re actually doing.
Step 2: Map Out the System
Once everything is clear, it’s time to decide how the puzzle pieces of your integrations fit together. Usually this means making decisions about:
- Which APIs will handle the transfers
- How fields and tags connect
- What happens if something fails
- How permissions get enforced
Step 3: Build the Connections
Here you start configuring the APIs that let your apps talk to each other. It can be straightforward sometimes. For companies that need more complex workflows, like only sending files once a deal closes, logic can be added using Apex triggers.
Step 4: Align Permissions
Don’t forget this step. Permissions are how you keep everything secure and compliant. If you’re not sure, double check with your legal team, before you start bridging applications.
Step 5: Test Everything
Before letting anyone rely on it, the whole setup needs to be tested. That includes checking if files land in the right place, if permissions are correct, and if everything holds up when lots of records move at once.
Step 6: Get People Comfortable
Even the smoothest integration will stall out if nobody feels sure about using it. Good training and clear guides help the transition stick.
Benefits of a Custom Integration
So why bother going the custom route when there are simpler tools out there?
The short answer: control and confidence. A custom integration lets you decide exactly how Salesforce and SharePoint talk to each other. You don’t have to shoehorn your process into someone else’s template. Custom solutions lead to:
- Flexibility: You can set everything up to match how your team does their work, without forcing them into some default system.
- Fewer Errors: Files and info end up where they should, so people don’t waste time fixing mix-ups.
- Tighter Security: It’s simpler to control who gets to see or change something without slowing everyone down.
- Easier to Scale: If your company grows or the process changes, you can adjust things without having to start over.
- ROI: It does cost more upfront, but you save that time later and avoid problems that take even longer to sort out.
Really, linking Salesforce and SharePoint just gives people one place to find what they need. However you set it up, the point is to get rid of the extra steps so people can focus on their actual work.

Andrej Fedek is the creator and the one-person owner of two blogs: InterCool Studio and CareersMomentum. As an experienced marketer, he is driven by turning leads into customers with White Hat SEO techniques. Besides being a boss, he is a real team player with a great sense of equality.